|
There is good and bad news associated with doing
this job. The good is that the repair is extremely
easy to accomplish. The bad news is that it will
take almost a full day to get to it and reassemble
everything when the job is completed.
Tools
Required:
phillips screwdriver
large flat screwdriver
socket wrenches
open-ended wrench
brake fluid
slave cylinder rebuild kit
Optional:
new slave cylinder
Removal
First remove the left seat. This is
done by sliding the seat all the way back and
taking out the two screws at the front of the
tracks. The rear of the tracks has two screws
that can be reached by sliding the seats all the
way forward. Lift out the seat.
The trim pieces around the transmission
tunnel must be removed. Take out the 4 screws
holding in the tunnel cover and the 2 screws
holding on the knee pads. Next remove the lower
dash support. It is held in place at the top two
screws (phillips screwdriver) and at the bottom
by four bolts. Remove the shift knob.
The carpeting covering the transmission
tunnel needs to be removed. Next remove the
transmission tunnel. It is held in place with 4
set screws on each side and 4 on the back
against the firewall.
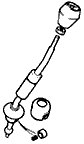
The slave cylinder is now easily accessible.
Start by loosening the bleed valve, draining the
system and the remove the valve. Remove the
hydraulic pipe and push it clear of the
cylinder. Then remove the locating bolt, nut and
washer. The cylinder may be difficult to slide
out. A large screwdriver wedged into to slot in
the side of the housing should loosen it.
While
it is out...
there are some things that you should
consider doing while you have access to this
area.
Change the Transmission fluid
Drain the fluid out of bottom and replace
the plug. Open the filler plug on the right side
to transmission and fill until fluid just
trickles out.
Reinsulate Transmission Tunnel
After a while the insulation inside the
transmission tunnel rots away or falls out.
Staple or glue in new insulation. Don't forget
that it will be exposed to the elements so
waterproof it with plastic sheeting.
Rebush the shifter knob
Shifter getting sloppy? Rebush it. The parts
can be purchased individually or as a kit.
Inspection
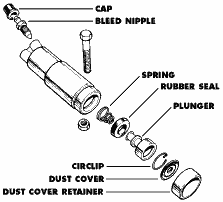 Remove
the dust cover retainer and the dust cover. The
retainer may require a pipe wrench with a gentle
twisting motion while pulling for removal. Next
remove the circlup. The plunger will either side
out easily or can be helped along by tapping the
whole cylinder against a wooden surface. Remove
the spring. Clean all parts thoroughly with
brake fluid. Never use gasoline or other
petroleum based solvents as they damage rubber. Remove
the dust cover retainer and the dust cover. The
retainer may require a pipe wrench with a gentle
twisting motion while pulling for removal. Next
remove the circlup. The plunger will either side
out easily or can be helped along by tapping the
whole cylinder against a wooden surface. Remove
the spring. Clean all parts thoroughly with
brake fluid. Never use gasoline or other
petroleum based solvents as they damage rubber.
The main thing that needs to be determined is
whether the cylinder is repairable. Carefully
inspect the rubber parts. If there any splits or
cracks, there is a good chance that all that
needs to be changed is the rubber. Run your
finger inside the cylinder feeling for scratches
or pitting. If there is minor scratches, try
using a fine steel wool the buff them out.
Thoroughly wash the inside with brake fluid to
remove ALL traces of metal flakes. If the pits
are too deep a new cylinder must be
purchased.
Rebuild
Rebuilding is a rather easy process. I
have never read it anywhere but I have found
that soaking the rubber parts in brake fluid for
about a half hour softens them. Start by fitting
a new rubber seal to the plunger with the fat
end away from the metal end. Insert the spring
fat end first. Wash the inside of the cylinder
with brake fluid then insert the plunger rubber
side first. Fit the retaining spring, dust cover
and then the cover retainer.
Refit
When refitting the cylinder, start by
centralizing the push rod in the housing. Push
the slave cylinder into the housing with the
push rod going into the dust cover. Line up the
grove with the hole and place the bolt in
through the top hole and tighten the nut.
Bleeding
the System
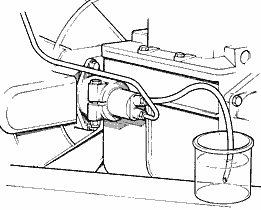 The
process is so easy that you forget to check the
level. Ask an assistant to monitor the lever
while you work. Start by filling the reservoir
with new, clean brake fluid. Next place a small,
preferably clear tube on the bleed nipple. Put
the other end of the tube into a cup partially
filled with fluid. Loosen the nipple one turn.
Depress the clutch pedal fully and let it return
without assistance. Repeat with a few second
pause between depressions. Notice the fluid
going into the cup. When a solid stream is
emitted from the tube without any air bubbles,
hold the pedal to the floor and tighten the
nipple. The clutch pedal should feel firm and
clearly disengage the clutch. If not, repeat the
bleeding process. Don't forget to check the
fluid level. The
process is so easy that you forget to check the
level. Ask an assistant to monitor the lever
while you work. Start by filling the reservoir
with new, clean brake fluid. Next place a small,
preferably clear tube on the bleed nipple. Put
the other end of the tube into a cup partially
filled with fluid. Loosen the nipple one turn.
Depress the clutch pedal fully and let it return
without assistance. Repeat with a few second
pause between depressions. Notice the fluid
going into the cup. When a solid stream is
emitted from the tube without any air bubbles,
hold the pedal to the floor and tighten the
nipple. The clutch pedal should feel firm and
clearly disengage the clutch. If not, repeat the
bleeding process. Don't forget to check the
fluid level.
Refitting
Everything Else
Refitting all the interior parts is
done in the reverse order that they were
removed. Easy huh?
 Return
to How To Index Return
to How To Index
|