
Overdrive Problems
Quick Diagnosis
| Overdrive does not engage | |
| Low oil level | |
| Faulty solenoid or wires | |
| Low hydraulic pressure | |
| Does not disengage | |
| Sticking solenoid valve | |
| Cone clutch sticking | |
| Control orifice between solenoid valve and relief valve clogged (clean only with air pressure) | |
| Faulty circuit in electrical system | |
| Cone clutch slipping in overdrive | |
| Low oil level | |
| Low oil pressure/sticking solenoid valve | |
| Worn or burnt clutch linings | |
| Slow disengagement, free wheeling on overrun, slip in reverse gear | |
| Sticking relief valve | |
| Sticking control valve | |
| Control orifice blocked | |
-Hayes Spitfire Manual
Probably 90% of overdrive problems that are not electrical faults are traceable to either the gear oil level being too low, or an improper adjustment of the solenoid, so we’ll skip these and concentrates on the others.
An overdrive that fails to engage can sometime be traced to dirt between the check bail and seat in the pressure regulator valve, or sometimes to a badly worn pump. Both are quite rare, though possible, so don’t overlook them. Worn or broken rings on the operating pistons or the accumulator piston can make for a lazy-shifting or slipping unit.
However, the real winner is a partially or completely blocked bypass port in the operating valve. The valve, which is activated by the solenoid through the operating shaft and lever, has a small hole bored in it (about .018′) which is very easily blocked by dirt, etc. The results of blockage can be really fun to find. First, partial or intermittent blocking results in slow engagement, but most noticeable is that there is no compression-assisted slowdown. The unit appears to hang between overdrive and direct drive and feels like it is not in gear. Basically, what is happening is that the partially blocked valve will not allow the oil to return to the sump fast enough, and the pressure build-up above the valve tries to engage the overdrive while the unit’s springs try to engage directly, and there we hang between the two. The fun begins when the bypass port becomes completely blocked. Above a certain speed, the pressure above the valve becomes high enough to engage overdrive, no matter what you do or where the switch is.
Fortunately, the valve blockage is easy to repair. With the transmission tunnel removed, the access to the valve is on the right side of the top of the overdrive unit and is under a 7/16″ plug. Under the plug is a spring and check ball assembly which can be removed with a small magnet. After it is cleaned, It can simply be set back in place, hole-in end facing up, followed by the ball and spring assembly. it Is very straightforward and easy to remedy once you find it.
-Ken Gillanders, Temple City, CA
“Lots of overdrive faults are due to switch on top of the gear shift lever not making proper contact.”
-from a magazine I read recently
It would be a good idea to point out that the problems listed here are mostly only for D types (pre 74) – J types have their own problems, invariably solenoid or unidirectional clutch.”
-John Kipping
Overdrive (Type D) – Operating Lever Adjustment
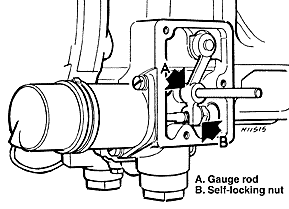
1. If the overdrive does not engage, or will not release when it is switched out, providing the solenoid is not at fault, the trouble is likely to be that the operating lever is out of adjustment. Adjustment can be made without removing the overdrive.
2. Undo the three bolts and washers holding the solenoid cover plate in position, to give access to the operating lever and solenoid plunger.
3. Procure a short length of mild steel rod of 3/16 in (4.76 mm) diameter. Switch the ignition on, put the car in to gear, and flick the actuating switch to the overdrive position.
4. If the 3/16 in rod can now be passed through the hole A in the operating arm into the hole in the casing, adjustment is correct.
5. If the solenoid does not move the arm far enough for the rod to be inserted into the hole in the casing, or if it moves the arm too far, hold the solenoid plunger from turning by means of the two flats machined on its shank, and pressing the plunger tightly into the solenoid, screw the self locking nut B in Fig. 6.26 in or out until the 3/16 in test rod can be pushed fully home into the hole in the casing.
6. Operate the switch several times, checking with the test rod to ensure adjustment is correct. Measure the current consumed by the solenoid which, with the operating arm correctly set, should be 2 amps. If a reading of about 20 amps is obtained this will show that the solenoid plunger is not moving sufficiently to switch to the holding coil from the operating coil.
7. Continuous high current will cause premature solenoid failure.
8. With the solenoid again de-energized, re-align the setting holes and insert the test rod. Hold the solenoid plunger against the blanking plug and check that dimension A is between 0.150 and 0.155 in (3.81 and 3.937 mm).
9. To obtain this dimension, alter the thickness of the blanking plug washer (on early models) or on later units turn the adjuster screw.
Links
Here is a set of wiring diagrams for the Overdrive wiring.