
Windshield Removal and Replacement
We have gotten quite a few requests dealing with windshield (windscreen) replacement. Most every question deals with the fear of breaking than anything else. With a caution, your windshield can be removed and replaced with minimal hassle and without danger of breakage.
Removal
The first process is to remove all the items near the windshield that would be in the way. Start with the interior. Remove the mirror by unscrewing one of the two screws in the mirror’s base. The retaining block and mirror should be able to be slid out. The sun visors do not have to be removed but it is a good idea (one less thing to be in your way). They are held on with a single screw at each end. Mk1-3 also have a center screw holding on the mounting bar that will need to be removed.
Before removing the wipers, take note of the position of the blades relative to the frame. This will help get them into the correct position when reinstalling. Removal is accomplished by lifting them to the “cleaning position.” Using a large, flat screwdriver between the large nut and the arm, pry up while rocking the arm with your other hand.
 Next is the removal of the chrome strip running around the windshield, assuming it is still there. Many cars I have seen lately no longer have it still in place. Start by sliding the center finisher covers over out of the way. Then use your wooden stick to gently pry out the strips.
Quick Tip
Use masking tape to seal the interior heater vents during windshield removal. If the glass is broken or gets broken during removal, flakes of glass won’t fall down into the vents and blow out into your face later.
Glass removal can be easy or difficult depending on whether the windshield gasket be used again. Some car insurance providers also put restrictions such modifications, so make sure you double check the documents before doing anything to your car. If not, the process is easy. Using a strong knife, like the ones used for carpet or a box cutter, cut the rubber gasket away from the glass. Push the blade into the center of the rubber, carefully feeling where the glass stops. Cut all the way around. The glass can easily be pushed out from the inside. If the gasket is still in good shape, things get a little more difficult. The rubber is supposed to be soft having no cracks. If there is any doubt, replace it. It’s not very expensive, under $30 (£20), and will be more flexible making installation easier and less likely to leak.
 Run the wooden stick around the circumference between the gasket and frame to break the sealant applied at the factory.
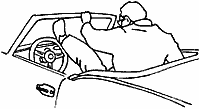
Sitting in the passenger’s seat, using your foot (soft, flexible shoes work best), gently push the glass. Don’t KICK! Remember, the more evenly the pressure on the glass, the less likely you are to crack it. Your helper should stand in the engine bay, on the tires. Using the stick again, push it under the inside lip at the top, prying just enough to get the rubber started through the frame, all the time being ready to catch the glass when it comes out. “Toughened” glass is less likely to break using the “foot” method. Laminated glass is very fragile so cutting the gasket is the preferred removal method.
MkI-III Owners
Marshall Pease suggests installing the windshield is easier by removing the frame from the car:
“From underneath the dashboard, undo the nuts pertaining to the two triangular washers that appear on the top. The defroster vents are considerably in the way, they can be removed or an extension ratchet wrench can be used.
At the corners of the windshield, below the dashboard, locate the rods that extend downwards near the driver’s & passenger’s outside knees. Remove the nut from the end of the rod, and loosen the bolt to release the clamp.
Gently insert a lever between the windshield frame and the top of the dashboard and gently pry the frame upwards; it may be desirable to slide a blade around to separate the black rubber gasket from the paint on top of the hood on the outside. Lift the windshield frame upwards until the rods are free, and remove it to a secure location for further disassembly as desired.”
While it is out…
There are a few things that should be done before reinstallation. Number one is to clean the glass. All traces of sealant must be removed before the new gasket goes back on. This is easily done by rubbing with your finger. A suitable window cleaner should remove dirt and grease.
Fix the Rust
Another area to check is the windshield frame for rust. Spitfire/GT6’s often rust there and it is much easier dealt with the windshield out of the car. A wire brush and your favorite spray rust converter will do the trick.
Polish the Glass
Having the glass out of the car is the perfect opportunity to polish the glass. Years of abuse by the wiper blades and ice scrapers take their toll. However, there is a way to remove scratches from the glass. Specialty automotive glass companies and Eastwood Company (1-800-820-9042) sell polishing kits that will remove the haze. Using a special polishing compound (Rhodite) and buffing wheel attached to a hand drill, you will be able to buff out all the glare causing swirls.
Clean the Dash
Don’t forget to clean the dash while the windshield out. A vacuum cleaner will remove all the trapped dust around the vents.
Quick Tip
One trick I learned revitalizing a very sun-faded dash it to “paint” it using shoe paint. Not polish but the paint used to fix badly scuffed leather (my wife bought it to fix the heels of a pair of dress shoes.) It is durable, easily put on using a rag, opaque enough to hide most blemishes but not look unnatural. It is sold at most shoe stores.
Refitting
 Start the process by fitting the gasket to windshield. Run a bead of sealant along the channel on the bottom half of the gasket. Because of its bowed shape, it goes on easier by slipping it on from what is the inside of the windshield. The heavy side goes to the inside, the side with the slit goes to to outside.
Quick Tip
The chrome strip is possible to install; do it while the gasket/windshield is off the car. A little soap and a finger is all you need to ease the lip into the back of the trim. The remainder of the installation is as described below.
Quick Tip
Leave the gasket in the sun prior to installation. This will warm the rubber and make it more flexible.
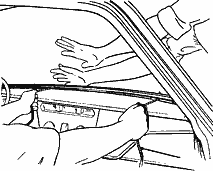 With your finger, rub petroleum jelly*** in the groove where the rubber meets the car. Put a little extra at the top and bottom at the center. Next starting at the bottom center, feed the heavy nylon cord around the same groove you just rubbed the jelly. You will need to have at least 2 feet extra overlapping in the center. The petroleum jelly serves two purposes, to help lubricate the gasket and keep the cord from sliding out of the groove. The windshield can now be laid in place from the outside of the car with the loose cords to the interior. With the assistant firmly pressing the rubber against the car to prevent the lip from slipping off, you slowly pull one cord out moving around the frame. This will draw the rubber lip over the flange of the body.
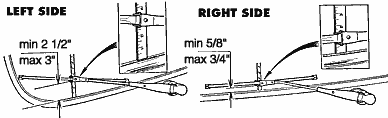
When the it is in you will need to clean up any excess petroleum jelly, reinstall the mirror, visors, chrome strips and wipers. Use the diagram below to get correct position of the wiper blades.
Update: A reader recently informed me that black masking tape in place of the petroleum jelly works well. It holds the cord in place equally well and is less messy. It tears easily allowing the cord to pulled from the groove with little effort. The reason for black it there will be some tape that you won’t be able to remove and black hides easier. I have been told that method can be accomplished with the chrome strip in place.
Instructions: lay the windshield outside down on a soft surface, fit the rubber around the windshield, tape it in place, run the cord around the groove, tape it in place. The rest of the installation is the same as above.
***Another Update: I have been told KY Jelly works better than petroleum jelly. Sold in drug stores in the birth control section, it is VERY slick, water soluble, and will not damage the rubber the way petroleum based products do (originally designed for use with condoms). Cleans up with ordinary water and brings to mind all sorts of the possible post-installation celebrations ;->
Chrome finishing strip
If you look around you will notice not many Spits still have the chrome strips and I am sure it is because it is just too hard to put back in. In fact, I don’t have them on both of my cars and have never done it.
That been said, this is what the Bentley and Factory Workshop Manuals say about the process:
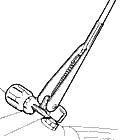
1. Using the “special tool“, locate the tool in the recess with open end uppermost and in a vertical position.
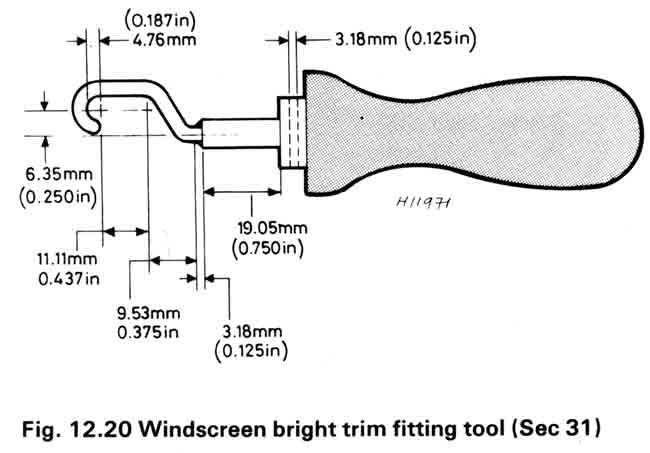
2. Keeping the hook firmly engaged in the recess, draw the tool along to engage the inner flange of the weatherstrip with the finisher.
The homemade “special tool” should be made from mild steel rod. The tip should be rounded and free of rough edges.
If you are installing the whole windshield then it is much easier to fit the strip before the gasket is on the car (see above) otherwise here are the instructions.
Also see this link for another How-to for installing the strips.