
Waist Seal Replacement
Removal of Seals
Lower the window. Starting at one end, insert a large but thin screwdriver between the door metal and seal. With the heel of your hand bump the screwdriver down pushing the clip loose. Work your way across the door.
Replacement of the Seals
Having the door panel off can greatly ease the installation of the seals but not necessary. You WILL drop a few clips into the door and no door panel makes it easier to get them back out. It will allow you to hold the seal in place from inside the door with your hands. You will need a special tool but it can be “homemade” or another object of similar shape can substitute.
Outside Seal (rubber): Fit the clips to the seals and lay the seal on the top of the door in roughly the position the seal will be. Because once the seal is in place, it is difficult to see the clip’s location. Mark their location with masking tape. Use your special tool to pull the clips into place. Remove the tape.
Inside Seal (fluffy): I found it a lot easier to fit the clips to the doors first not to the seal. Use your special tool to pull the clips into place. Next snap the seal into the clips.
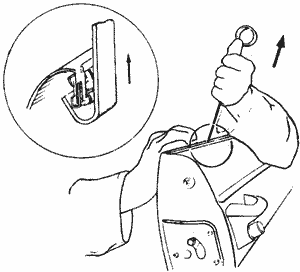
My homemade tool was fashioned from an old curtain bracket laying around in my workshop. It was bent into the “J” shape by hammering it. One trick I found is that if you can make your tool hold the clip firmly they are less likely to fall into the door. Put a clip in the tool and hammer the “J” until the clip is tight in place but not too tight or it won’t let go on the door.
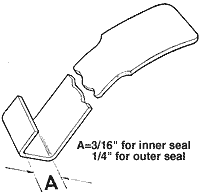
Also, there are two sizes of clips. The thinner ones go to the outside (rubber) seal and wider ones go to the inside (fuzzy).