Dayton J. Carpenter ‘s Chevy V6
THE BEGINNING OF MY SPITFIRE ERA
I bought my first Spitfire when I as 18 years old, that was in 1982. I had no idea what a Spitfire even liked like. I happened to be reviewing the local newspaper’s classified car ad section looking for a used car and a friend happened to see a Spitfire listed. He mentioned that a Spitfire was small but sporty looking English car. He talked me into looking at the car. After seeing the car, a 1974 Spitfire, I immediately fell in love with it. I negotiated the asking price of $1,800 to $1,000. I had brought the full $1,800 with me but before arriving I tucked $800 inside my shoe. The owner did not know this so I able to buy the car for $1,000. The ‘old wave the cash in front of his face method’ usually works. Shortly afterwards, this same friend told me about the AC Cobra and how the bodylines were similar to the Spitfire. I started conducting some research on the AC Cobra and was able to find some articles with pictures and specifications of the car. I agreed with my friend’s opinion about having similar body styling to a Spitfire.
Within the next two years I had either bought, sold, accumulated, parted out, etc. approximately six other Spitfires. This had become a sort of hobby or side job where I was actually making a little money. I acquired my seventh Spitfire from Clarkies Salvage yard in Saratoga Springs, New York under a theft recovery title. Before buying the car at the salvage yard I fired up the 1500cc engine. There was a loud knocking noise and I thought the lower unit was bad. One of the salvage yard’s employees told me it was only a loud value tick. I thought it was little excessive for a value problem but at this time I had no experience with lower end problems. I bought the car for $800 dollars. Latter, when I got home and pulled the head off and realized I had a fist size hole in the block. The hole was in an area that you could not easily see or access from the top of the engine. I think they knew this at the salvage yard but live and learn and trust your instincts. After finding out that the engine was wasted, I decided I would use the car to make a replica of an AC Cobra on Community College student’s budget, which was not much to say the least. Today I have an excellent relationship Clarkies Salvage Yard but I still give them grief about that car. They have more than made up for that mistake over the past 18 years by providing me with numerous parts and favors that has made my V-6 conversions possible.
PAST HISTORY USING THE 2.6L CAPRI V6
In 1984, I started transplanting a 2.6 L V-6 from a 1972 Capri into my Spitfire. At this time I was 20 years old with no automotive design or engineering experience. I decided to use the 2.6L V-6 based on its dimensions and reputation as a decent high RPM engine, at least for a small V-6. Some basic modifications were made to the car to get the engine to fit. Since the 2.6 L V-6 was a 60-degree engine it was rather tall (see picture 1) compared to original Spitfire 1.5 L and the current 4.3 L V-6 90-degree engine. In order to accommodate the height of the intake and carb a hole was needed in the bonnet. My crude custom design engine mounts probably did not help much in terms of the height clearance problem. Initially I used the Capri 4 speed manual transmission and the original Spitfire rearend. A new driveshaft was fabricated by a local machine shop that obviously did not know what they were doing, nor did I in that case. The machine shop welds looked like my first arc welding welds, which resembled pigeon droppings.
Afterwards I had a radiator shop make some modifications to the Spitfire radiator so I could use it with the 2.6 L V-6. After I figured out how to hook-up the clutch and transmission linkage then I could at least start and move the car. So my friend, Aaron Pulaski, and I fired the beast up with only the exhaust manifolds installed. The monster started and I could move it under its own power but it was loud as hell and was shooting flames out the exhaust manifolds like a fire-breathing dragon. With no further improvements or time the next day, my friend and I took the car to the New York State Department of Motor Vehicles’ (DMV) theft recovery unit in Albany, New York for an inspection. The car had to be inspected before DMV would issue new VIN tags since the car was theft recovery vehicle. No one at DMV told me before hand that the vehicle had to be driven into the garage on its own power. Neither the car, nor I was prepared for this little problem. The car had no interior or battery. The clutch cable, like most of the other components, was not properly fastened in place. If the car were not driven in under its own power, I would have had to forfeit the $100 inspection fee. At this time, this was about a week of wages for me. So we took the battery out of our tow vehicle and installed in it the Spitfire. With no exhaust system or seats, we fired the beast up again. It was difficult to control the gas and clutch especially without having a seat. Like a bat out hell, tires spinning and loud as dirt track car, I drove into the garage. This certainly was not intentional. I had never driven the car before and I was using a wash bucket as a seat. You should have seen the expressions on the inspectors’ face. Shaking their heads they just looked at me like I was crazy. Afterwards the inspectors openly shared their thoughts with me. They said “your going to kill yourself in this thing”. I am not sure if it was my design or the concept that really concerned them. Boy being young was fun!
Once the car was finished and painted in 73 Corvette yellow driving it at 55mph your teeth would fall out because the car shaked so much because of an unbalanced driveshaft. Believe it or not, a friend who is a sheriff clocked me in this beauty at 105 mph on radar. Still, looking back 15 years, the project was a success for the most part, but certainly it was not a work of art. Sometimes I don’t know how I managed to create it or dared to drive it.
MAJOR PROBLEMS AND MODIFICATIONS
The major problems plaguing the car were rearend blowouts, over heating, and a poor exhaust system. Every year I would blow out one or two of the stock Spitfire rearends. The Spitfire half-shafts were also a problem especially the flanges since they would either split or the bolts would always loosen up even after using locktite. Finally after blowing out the Capri 4-speed transmission I decided to put a Ford C-4 automatic transmission in the car to reduce the shock being delivered to the Spitfire rearend. This was somewhat of a major project since the Spitfire frame needed to be modified. After having the frame modified by a professional shop with racecar experience, the transmission was coupled up to a new drive shaft that had been properly fabricated by Universal Joint in Syracuse, New York. Still even after using the C-4 automatic we had another rearend blowout. After thinking about it and doing some research we decided to replace the Spitfire rearend with a Datsun 610 rearend which is very similar to the Datsun 240-60Z cars rearends. By this time I had been introduced to someone, Tom Roock, who could rebuilt, design, and fabricate anything so it looked and functioned better than any OEM equipment. Fortunately for me he became interested in the project and from that point on we have been “partners in crime”.
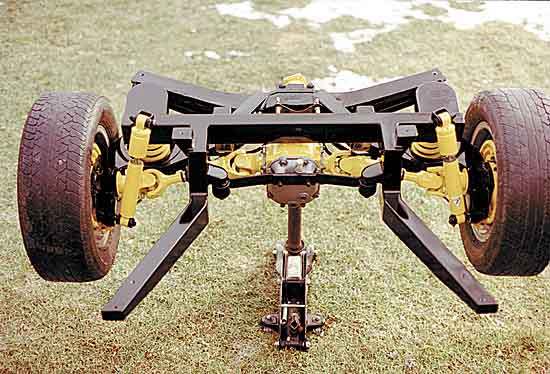
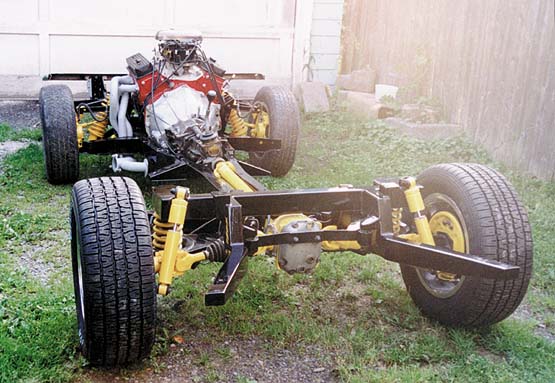
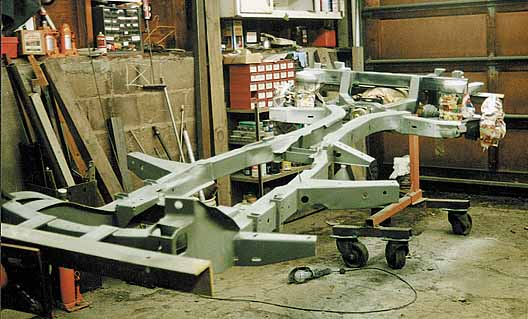
To fit the new Datsun rearend, we had to remove the original Spitfire frame from the rear seats back and fabricate a new one. The Spitfire tub had to be modified with spring and frame pockets to accommodate the new frame and rearend. The fabrication and installation of the Datsun rearend spanned 9 months and took about 2,000 man-hours to complete. We used 3″ x 5″ box steel to fabricate the new frame. We tapered the frame tails and made other modifications that are functional but also look good. We still used the Koni shocks in the new rear suspension system. The rearend and frame modifications are truly a piece of art that function much better than the OEM system. The only portion that we had to “farm out” was the shortening of the half shafts since they were made of hardened steel.
After driving the car for several years, we realized the rearend was no longer a weak point in terms of both durability and handling. As you probably know, if you take a Spitfire hard into a sharp corner, the rear suspension geometry does not give you much in terms of real handling. The tires want to tuck in under the car causing it to roll and over-steer in really hard cornering situations. By using a shortened Ford 9-inch straight axle rearend, we would have greatly reduced the number hours on this phase of the project. However, the Ford rearend would not provide the handling and traction that the truly independent Datsun 610 rearend gives us.
MOVING TO THE 4.3L V6
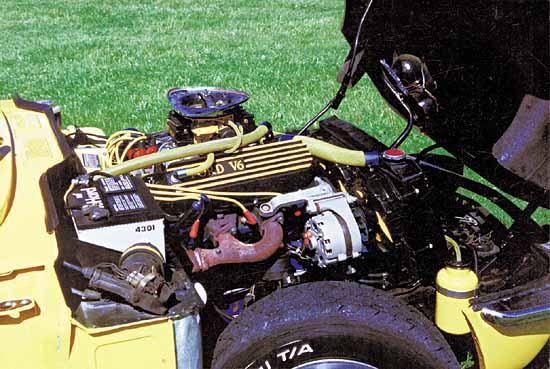
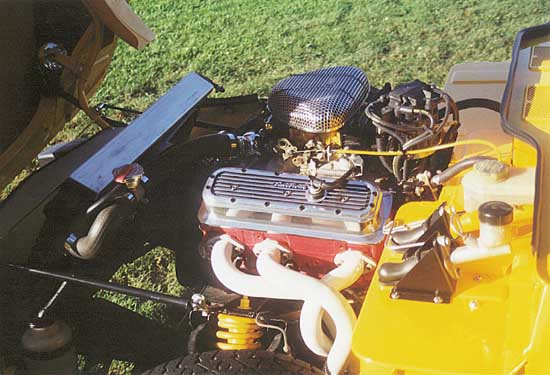
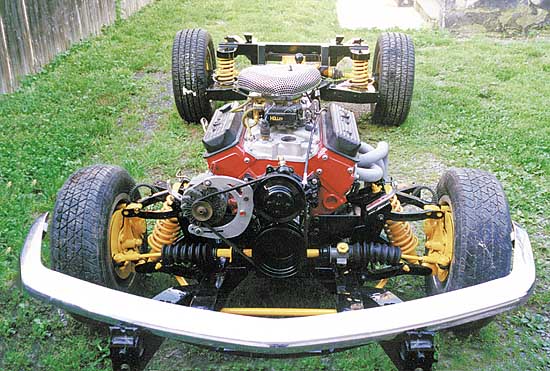
After working the rearend bugs out, I decided I wanted more performance from the Capri V-6. We had already modified the engine with a four-barrel intake, Holley 4BBL Carburetor, custom cam, and solid timing gears. Custom headers would be the next logical step. After Tom and I realized that no matter what we did within reason and budget, we would still have only 158 cubic inches to work with. So we carefully researched engines, their weight, dimensions, oil pump location, parts availability, and of course took into account the engine’s cubic inches. We did not want to modify the bonnet or the firewall. Except for the side pipes, we wanted to keep the car looking stock from the outside. After many debates and discussions, the general consensus was to use the Chevy 4.3L V-6. The engine had a good track record, parts were available and reasonably priced because many of the small block parts can be used on the Chevy 4.3L V-6.

Backing our engine choice was the fact that the Chevy 4.3L V-6 has quite the punch even when in a relatively heavy Sports Utility Vehicle with an automatic transmission and emissions equipment. To fit test the Chevy 4.3L V-6 we borrowed an engine core from my friend’s salvage yard (Central Auto Recycling). From the fit test we knew the engine swap was feasible with some modifications. So the next thing I did was to buy a low mileage engine (30K) that we would leave stock, so we thought. To physically fit the Chevy 4.3L we had to make custom motor mounts and modify the oil pan so we could lower the engine further. Now it sits just above the steering rack. We used engine-mounting system that bolted to the front of the engine. The headers, of course, were custom made with about 150 man-hour. By looking at them, you would think they were made at the factory and they sounded like it too. They use a cross over pipe that is tucked neatly under the frame and exits into a set of side pipes.
Some modifications to the floor pan on the passenger side were necessary to clear the frame rails and to accommodate the Borg & Warner T-5 transmission. The frame needed to be slightly notched to access the oil filter for easy removal and installation. We had also decided to swap tubs since I had bought another car that had a tub in better condition. So we had to remake the rear suspension modifications on the new tub. The stock sheet metal from the new tub was MIG-welded into the old tub so I could use it on a stock frame.
At the time, that was the plan, but things change in life. Shortly afterwards, I decided to apply to law school. I was accepted and off I went. For one year I hardly touched the car. I sandblasted the front cowl section and replaced the floor pan and the inner and outer rockers on the driver’s side. Everything was mig-welded watertight. The welds were ground down evenly on the floor pan so everything looked OEM. The car spent the next year in a garage and the following year outside as four other projects occupied my spare time so I could earn some spending money. I ended up buying a 1967 Jaguar XKE 2+2, 1973 TR-6, 1980 TR-8, 1976 MGB, (3) 1980 Spitfires, a 1978 Spitfire, and a London Taxicab before getting started again on the V-6 Spitfire Project. I did some mechanical work to get the Jag running and then sold it. The real problem was I got into a full restoration on the TR-6 that took about 2 years. I bought the car for $800 and sold it for $9,500 to an avid Triumph owner. This gives you an idea how well the restoration was done. I repainted it the original OEM dark brown, almost black, which would show any imperfections. I wish I still had that beauty. I restored another stock Spitfire and MGB before really starting again on the Chevy 4.3L V-6 Spitfire. The remaining cars I bought were parted out or needed only minor repairs before I sold them.
THE CHEVY V6 ENGINE
The point the V-6 Spitfire was neglected for several years. During its storage outside, the tarp had weathered and ripped, allowing water to leak down through the intake into the engine. The entire oil pan was full of water. So after graduating from law school, completing a masters degree, and successfully passing the bar exam, it was time to finally start the project again. By this time, I was working in a Upstate New York law firm as an attorney so time, to say the least, was especially limited since I practiced International Law and had to travel to Asia frequently. When I was off on business in Asia, I had the engine completely rebuilt by a local machine shop. We could have done it ourselves and put it back together as a slightly modified engine, but since time was short, I sent it to the machine shop. We had the block bored out, installed a custom ground cam, forged pistons, ARP rod bolts, a roller timing chain, new valves, roller rockers, heavy duty valve springs, an Edelbrock manifold, a Holley 4 barrel carburetor and other high performance components so the engine would be solid up to 6,500 RPM and could take a nitrous boost at a later date. To keep everything under the original Spitfire bonnet, the Edelbrock manifold had to planed down. We decided at first point to go with a carbureted system. We wanted to make the throttle cables match the yellow color scheme or the car. Instead of using the all to common black throttle cable I found some matching bright yellow bicycle cable at a local bicycle shop. A Holley electronic fuel pump that is mounted in the trunk compartment feeds the fuel system. In the near future we may look at using Fuel Injection and/or Nitrous. The distributor is out of a 229 V-6. We also dressed the engine up with a few chromed accessories and aluminum valve covers.
THE TUB/SHEET METAL
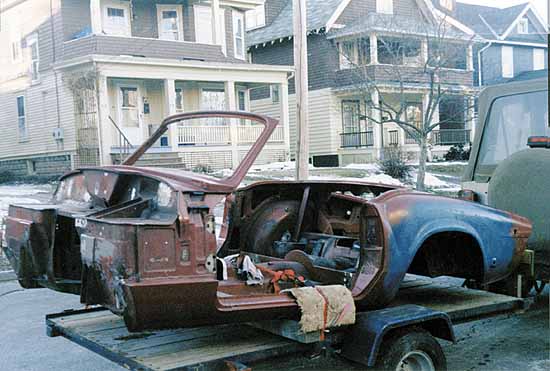
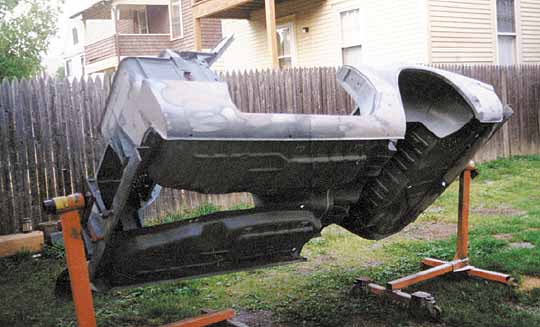
The next problem that needed to be addressed was the tub that we had already taken the time to install new suspension pockets and modify the floor pans since it had become badly rusted as a result of the water leaking through the tarp. It was still a workable tub, but I managed to locate another Spitfire that had been stored inside a factory in Albany, New York for about ten years. The car was originally from Alabama. I had found my new donor tub. I recovered most of the cost of the donor car by selling the Spitfire’s 1.5L engine and transmission. The tub was basically rust free but had some hidden bondo in it that was not noticed until we stripped it. This project was a complete frame off restoration. Every component, and I mean every thing, was stripped from the tub and frame to be replaced or rebuilt and then painted. Once everything was stripped from the frame I had it sandblasted. The frame was then primed it with PPG DP-42 etching epoxy primer and then painted with black PPG DCC urethane single-stage paint.
As for the tub, we debated on whether to have it acid dipped or lightly sandblasted. The tub was basically rust free and the closest acid dipping facility was 10 hours away so we decided to have it sand blasted. I took the tub and doors to be sand blasted by the same person who had done the frame. He had done a decent job on the frame and he assured me he could do the sheet metal without a problem. He mentioned that he had done a number of sheet metal pieces and only once warped one. Tom and I told him to be extremely careful since we had put countless hours into locating the tub and straightening and modifying the sheet metal. We did not want any warpage. He assured us it would not be a problem and that it would be finished the next day. I was the first to arrive to inspect the job. I almost cried! Most people would not have noticed the panels were warped. However, I had done enough bodywork to notice it immediately. It was difficult to see because of the peaned surface of the sandblasted metal. Next, I ran my hand across the panels and I could not believe what I felt.
I did not say much until Tom showed up. He did not think that it was warped badly until we got the sheet metal home. Before I left, I told the sandblaster I would have to think about how I wanted to solve the problem. He did not know I was an attorney. When we got home we realized he had warped every panel on the car, including the floor pans and the metal dash. Later, I called the sandblaster about the warpage problem and he admitted that he used too much air pressure. I later sued him for $2,800, the judge awarded me $1,600. It took us another week to re-straighten the sheet metal and another 300 hours on the bodywork. Earlier in the project, Tom and I had made a rotisserie from two engine stands that made working on the tub easier. Once the bodywork was finished, it was off to my friend’s body shop (Franklin Restorations) to be painted. We used a total of 4 gallons of PPG epoxy DCC single stage ’73 Corvette Yellow on the inside and outside of the car.
COOLING SYSTEM
After fit testing about 20 different radiator models, we found an aluminum one from a Chevy Corsica that would work for our application. The single motor, dual speed cooling fan is from a Ford Taurus with 3.0L engine. We used two Honda thermostat switches to control the fan. One switch is installed in the intake manifold and the other one is installed inline between the radiator and intake manifold. An inline adapter was needed to couple the thermostat housing hose to the radiator hose since the hose diameters were not the same. The petcock treads on the inline adapter were the same as the Honda thermostat switches. Sometimes you get lucky! The thermostatic controls are run through two heavy duty Ford Taurus fuel pump relays that are actuated by the thermostatic switches. The power draw from the fan is substantial, so using the relays reduces the load on the fuses.
By having one temperature switch on the manifold and other one inline, they kick-in the dual speed fans at different temperatures. The temperature switch and radiator work like a charm. Even on the hottest days sitting in traffic the temperature does not move above 190 degrees. The frame had to be slightly notched to accommodate the Chevy Corsica radiator. We made a custom aluminum radiator shroud and support. This took about 100 hours. If you look at the radiator, you would not know what is keeping it in place. It looks better than a stock application (see picture 6)
BONNET SUPPORTS
To keep the Spitfire bonnet up, we used modern hydraulic hood props to replace the cheap, ugly and poorly working original Spitfire bonnet prop. We used two, one on each side. Now, the hood can be opened effortlessly by one person. It also looks nice. Obviously we had to design mounts for the new props. The bonnet prop mounts, on the frame side, were made from aluminum while the mounts on the bonnet side were a combination of aluminum and steel.
CLUTHCH AND TRANSMISSION
Fitting the new Borg-Warner T-5 transmission in the car was fairly easy since the modifications to frame that were previously done to fit the C-4 Ford transmission were sufficient. We removed the Spitfire rear transmission mount and made a new one that accepts a GM rear rubber transmission mount. Of course we had a new drive shaft made.
Figuring out the mechanics to operate the clutch was another matter. I wanted to use the original Spitfire hydraulics and to try and keep things relatively simple and easy to replace. The only problem was the Chevy small-block manual transmission’s bell housing was set up to push the clutch fork from the front side of the engine. This meant the slave cylinder would need to be mounted on the engine side of the bell housing. We did not have enough room between the transmission and bell housing for the clutch fork so we could not use this setup. Fortunately for us the bell housing’s clutch fork pivot ball boss was a tapped hole which if enlarged would accept the Triumph’s slave cylinder on the backside.
Still we had to change the pivot of the clutch fork from a front to back setup. Luckily the Ford Mustang along with other vehicles also use the T-5 with a slightly different setup. The Ford Mustang uses a clutch fork that pivots on the opposite side. This I thought would give us the motion we wanted to push the clutch fork from the back of transmission towards the engine, basically the same as a Spitfire. The Ford Mustang clutch fork also accommodated the GM throwout bearing. We had to make another mounting boss for the pivot ball. This had to be TIG welded, ground, sanded, drilled and tapped. The clutch fork also had to be cut and reinforced. Other portions of the bellhousing were also modified to reinforce the mounting of the slave cylinder. We also made a cover for the slave cylinder to keep it clean and dry. We had tried using the more common Spitfire slave cylinder with a 7/8 inch bore, but the throw was not long enough. We needed a smaller bore for more throw. Lucky for us, the early Spitfires used a 5/8 bore that worked perfectly. This was after spending about 20 hours looking and trying several other different slave cylinders. The total hours spent modifying the bell housing was about 100 hours. The clutch and pressure plate are from a Chevy V-8 Camaro.
Hooking the speedometer up took some more thought and calculations. We wanted to be able to use as many stock parts as possible so we hooked a 54″ MGB speedometer cable to a 90-degree adapter to give us the necessary clearance between the frame and transmission. The 90-degree adapters are used on the Spitfire overdrive transmission and most MGBs. The threads on the Borg & Warner T-5 transmission speedometer unit needed to machined from a standard thread to a machine thread like the one used on the 90-degree converters. The inside of the GM speedometer gear drive coupler needed to be hand filed out to properly fit the MGB cable. After checking the speedometer gear and finding out the speedometer was not accurate, I calculated things out using a relational formula to determine the right speedometer gear. It worked and now the speedometer is dead on. We verified this by using a Global Positioning Satellite unit.
BRAKES AND SUSPENSION
To increasing braking efficiency, we used the GT-6 suspension and braking components. The rotors and the disc brake calipers are more heavy duty than the Spitfire’s. The front pads are about 30% bigger than the Spitfires are. Braking now is not an issue. We used rear drum brakes from the Datsun 610. They are about twice the size of the original Spitfire brakes. The tires are BF Goodrich TA Radials, on the rear I use 245/60 14″ while the front are 185/70 13″. Both the front and rear tires are mounted on the older style magnesium slot mags.
ELECTRICAL SYSTEM
An AC Delco 94 amp alternator powers the electrical system of the Spitfire. I installed a used GM fusebox that has 20 fused circuits as compared to the Spitfire’s three. Now all the Spitfire’s electrical components are separately fused. We also moved the fuse box into the interior of the car up under the dash. It is easy to access using a pivoting bracket we made. So when not in use, it is tucked under the dash. When needed, it conveniently swings down for easy access. The GM fuse box also has a heavy-duty circuit breaker built into it that we decided to use for the headlights. The headlights, of course, are Halogen.
The battery was moved to the trunk for weight and appearance reasons. The battery was installed in a sealed plastic marine battery box that is secured by a custom-built battery mount. The positive battery cable runs through the wheel arches and the interior of the rocker panels. This keeps the cable out of harms way and the elements. The original Spitfire battery box was welded closed. The firewall section was completely refinished with about 200 hours of labor.
INTERIOR TOUCHES
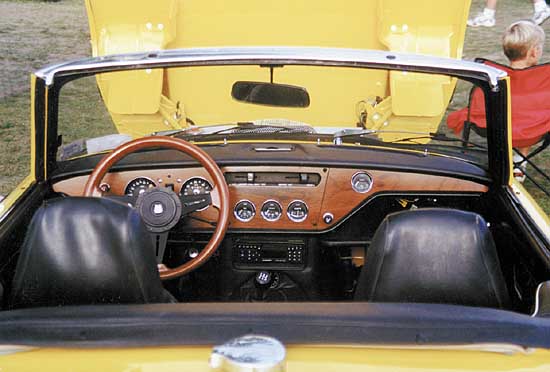
I rebuilt all the Smith instrumentation gauges. I also decided to add Smith oil and amp gauges, and a VDO vacuum gauge. I made a new dash from solid Honduras mahogany to match the wooden LeCarra steering wheel. Before making the new dash, we decided to relocate the head light and hazard switches. I used MG directional indicators since the MG used two green arrows indicating left and right rather than the one round green light on the Spitfire that merely tells you the switch is on. Now you know which directional is on plus the MG arrows look much classier. The electronic tachometer and speedometer are out of a 1968 MGC that came with a factory 6-cylinder engine. The gauges are smaller in diameter than the original Spitfire’s and look better. Also the MGC tachometer is labeled for a 6-cylinder engine. The tachometer still needs to be rewired so it can be used with the HEI ignition system. The stereo system consists of a Blauplunk AM/FM cassette player, a Blauplunk 10 Compact Disc Player, a Jensen 100 amp amplifier and Jensen Speakers.
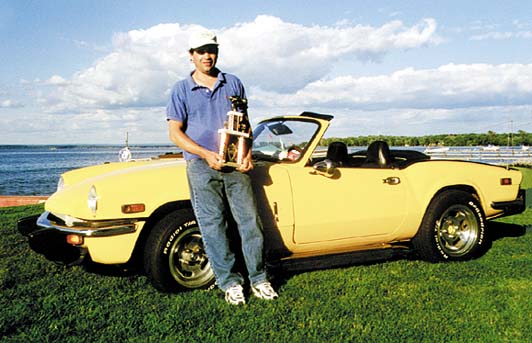
THE FINISHED PRODUCT
When we first fired up the beast she ran a smooth and quiet as can be with just a little tweaking. As for horsepower the engine is putting out about 265 HP. I don’t need to say how quick the car is, do I? But I will just the same. The quarter mile drag strip time with street tires 14 seconds. I figure we should be in low thirteen’s with race slicks based on my 60 foot times, and high twelve’s with some tweaking on the engine. As for a torque rating we estimate it to be about 260 ft/lbs@2900 RPM. 0-60 MPH estimated at 5.0 seconds with a top speed of 142 MPH. Lets put it this way when I race at the strip I start in third gear and can still smoke the tires.
As for street and highway driving the car drives like a dream. Cruising at 70mph in 5th gear the engine is only turning about 1,800-2,000 RPM. I have had up it to 120mph on the NY thruway without any shakes or effort from the engine. I figure that we have about 5-8,000 hours into this project. If you saw the car or had the pleasure to drive it you would know it.
WHAT’S NEXT
Now, I live and work in China. The car is stored in a garage in Syracuse, New York basically year round. Once a year, in the summer, I return to New York for about one month to drive the car. I think giving up my Spitfire is one of the biggest sacrifices I made coming to China. I had just completed the project before leaving for China in 1998. Since completing the project I have only driven the car for 1,200 miles but every second I am in it there is a big smile on my face. As some of you know my next project is having leather seat covers made for the car here in China.
CREDITS AND THANKS
Lastly and most importantly I would like to thank the following people for their help:
Tom Roock, like a big brother, the best mentor anybody could have, and on making the project possible and nearly perfect.
Aaron Pulaski and Clovis “Cobber” Carey for their assistance with the Capri 2.6L V-6 conversion and continued support and advise.
Joe Simon at Central Auto Recycling, Syracuse, NY (315) 468-3454 for their help and supplying me with the parts to figure out how to put the beast together. Without them I would have been lost and even poorer.
Jeff Franklin of Franklin Restorations in Syracuse, NY, (315) 478-1103, for teaching me the right way to do restoration quality bodywork and letting me use his shop to finish my bodywork.
Walt Clark of Clarkies Salvage Yard in Saratoga Springs, NY for giving me access to some of his most prized English car parts. If you call him, he will probably tell you he does not have any English car parts, he saves them for me.
My good friend Mark Driscoll who probably did more talking than work but never the less was there when I needed him and his advise.